
Fabric Stenciling Tools & Materials
What Will You Achieve by the End?
- Prepare a minimal professional stencil kit that can later be upgraded
Tool Choice and Edge Quality
When it comes to fabric stenciling, your tools directly determine the quality of your print. Even the most skilled hand cannot compensate for brushes or paints that behave poorly on fabric. Understanding how each tool affects edge sharpness, paint control, and durability is the first step toward consistent, professional results.
Why Tool Choice Matters
Not all brushes, paints, or stencils perform the same. For instance:
- Brush stiffness controls how paint deposits on the fabric. Too soft, and paint spreads under the stencil; too hard, and the edges look rough.
- Paint viscosity affects absorption and sharpness. Fabric paints are formulated to sit on fibers without bleeding, unlike acrylics for paper.
- Stencil material determines stability. Paper or cardstock provides a simple professional starting point; flimsy paper bends and smudges edges.
Choosing the right combination ensures clean lines, even coverage, and prints that last after washing.
Investing in the correct fabric stenciling tools from the start saves time, frustration, and ensures your prints look clean and professional.
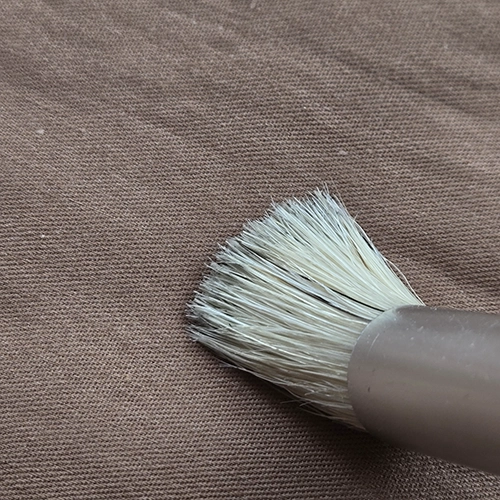
Stencil Brushes
In fabric stenciling, the stencil brush is the primary tool that governs how paint deposits on the fabric and how sharp your print edges will be. Selecting the correct stencil brushes is an essential part of choosing your fabric stenciling tools because all other factors depend on how paint is handled at the stencil interface.
What Makes a Stencil Brush Different
A stencil brush is not the same as a standard painting brush. It is engineered to deliver controlled paint application through a stencil with minimal bleeding and consistent coverage. The differences matter because fabric behaves very differently from paper or rigid surfaces.
1. Shape and Cut
- Stencil brushes have a flat, evenly trimmed top.
- This flat surface distributes paint evenly across the stencil opening without pushing it under the edges.
- Standard round or angled painting brushes lack this cut and tend to create uneven pressure, which causes bleeding.
2. Bristle Material and Feel
- Natural bristles (e.g., hog bristle) are dense, slightly springy, and hold paint well without collapsing.
- Synthetic fibers can also work but should mimic natural bristle resilience.
- Hair that is too soft allows paint to slip under the stencil and causes bleeding.
- Hair that is too stiff can create rough, uneven marks on the fabric.
- A good stencil brush should feel springy and controlled — firm enough to keep paint from spreading, yet flexible enough to apply color smoothly.
3. Bristle Density
- A brush with dense, tightly packed bristles helps control how much paint reaches the fabric and supports clean, sharp stencil edges.


Recommended Brushes
For beginners in fabric stenciling, start with medium to firm, flat-topped stencil brushes made of natural or high-quality synthetic bristles. Choose sizes that allow you to comfortably cover your stencil openings without overloading paint. These brushes provide the control, edge sharpness, and paint handling needed for clean, professional results and form the foundation of your minimal professional stencil kit.
Fabric Paint vs Other Paints
On fabric, paint does not sit on a flat surface — it interacts with flexible fibers that move, bend, and are repeatedly washed. Because of this, the type of paint used in fabric stenciling tools determines not only appearance, but also permanence.
How Fabric Paint Behaves
Fabric paint is formulated to bond with textile fibers while remaining flexible after drying. It penetrates slightly into the weave instead of forming a rigid film on top of the cloth. This controlled absorption keeps edges defined while allowing the printed area to move with the fabric rather than cracking.
Key properties:
- Wash resistance: color remains stable after cleaning
- Fiber absorption: controlled penetration without spreading
- Flexibility: printed area bends without breaking
- Surface stability: edges remain intact over time
Why Other Paints Fail on Fabric
Many beginners attempt to use standard acrylic or craft paints. These paints are designed for rigid surfaces such as paper, canvas board, or wood.
Typical results:
- Paint sits on the surface and stiffens the fabric
- Cracking appears after bending or washing
- Edges become blurry due to uncontrolled spreading or later flaking
- The print looks acceptable at first but degrades quickly
These paints may be used only for temporary testing, not for finished work.
Common Mistakes
- Choosing paint based on color range instead of function
- Assuming all acrylics behave the same on fabric
- Judging success before the first wash
- Trying to compensate with more layers instead of correct material
Within your fabric stenciling tools, fabric paint is not optional — it is the material that makes the print part of the textile rather than a coating on top of it. Using the correct paint ensures the stencil result remains clean, flexible, and durable over time.
Paint Label Guidance
When selecting paint, check the container and look specifically for “Fabric Paint” or “Textile Paint.”
Some paints mention fabric among several surfaces (such as paper, wood, or canvas). This indicates they can be used on fabric, but they are general-purpose formulas. If you are aiming for reliable, professional results, they are not recommended. Instead, choose paints specifically labeled Fabric Paint or Textile Paint.
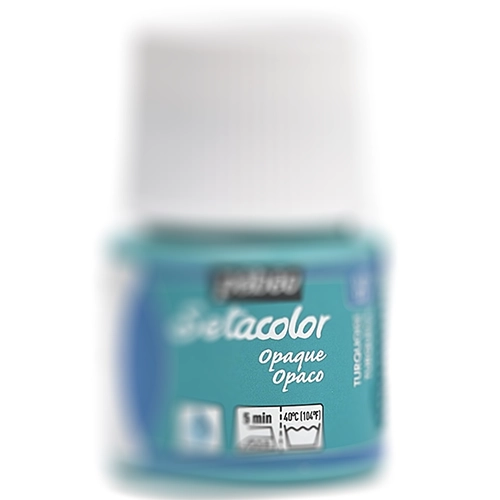
Also Fabric paints are usually sold in two basic types:
- Opaque: covers the fabric color and shows clearly on both light and dark textiles
- Transparent: allows the fabric color to show through and works best on light fabrics
Note: Transparent fabric paints are generally not suitable for stencil printing on fabric. They are not incorrect — they simply require more planning and fabric awareness. For beginners, opaque fabric paint is the safest starting choice because it produces predictable and visible results.
Practical Note:Not all opaque fabric paints are labeled as “opaque.” In many brands, opacity is the standard formulation and may not be written on the bottle. Transparent paints, however, are usually labeled as transparent, translucent, or described as allowing the fabric color to show through. If no transparency is mentioned and the paint is sold specifically as fabric or textile paint, it is typically opaque and suitable for stencil work.
Minimum Stencil-Making Materials
At this stage, the stencil surface only needs to be stable and predictable. We are not aiming for permanent stencils yet — only a reliable starting material that works consistently with your fabric stenciling tools.
Recommended Surfaces
Begin with materials that cut cleanly and stay flat:
- Heavy coated paper: suitable for short use and small projects
- Firm cardstock: more durable and reusable for multiple prints
Different thicknesses will affect how many times a stencil can be reused, but both provide controlled edges for learning and regular practice.
Note: For long-term or repeated production use, permanent stencil sheets such as Mylar exist and will be introduced later when durability becomes necessary.
Required Cutting Tools
- Cutting knife
- Cutting surface (self-healing mat or protective board)
These tools are sufficient to create accurate stencil openings without damaging the material.
(Stencils can also be produced using cutting machines such as Cricut, but this course focuses on manual methods.)


Recommended Tools & Materials
If you choose to purchase through these links, the price remains exactly the same for you. We may receive a small commission from Amazon if a purchase is made within 24 hours after clicking the link.
This helps support the creation of free lessons like this and allows us to continue sharing more educational content. Thank you for supporting our work.
Fabric Paints:
Reliable Starter Fabric Paint Set
Note: A high-quality beginner-friendly option with a balanced color selection. Suitable for learning and early fabric stenciling projects.
Beginner-Friendly Fabric Paint Option
Note: Good quality and an appropriate range of essential colors, making it a solid and accessible starting choice.
Best Value Color Set (Wide Color Range)
Note: A personal favorite for its strong quality, well-selected color palette, and generous paint quantity, making it a cost-effective choice for regular practice.
Professional Fabric Paint — Artist Grade Option
Note: A high-performance fabric paint recommended for artists working more seriously with fabric art and seeking professional-level results.
Professional Fabric Paint — Advanced Studio Choice
Note: A premium-quality option suited for dedicated fabric art practice, offering reliable performance for long-term artistic work.
Stencil Brushes:
Recommended Starter Stencil Brushes
Note:A reliable set with practical sizes, standard handle length, and balanced quality for beginners. These brushes offer good control and are suitable for learning proper stencil technique — personally tested and proven comfortable to work with.
Short-Handle Stencil Brush Set
Note: Similar performance to the starter set, but with shorter handles and slightly larger brush heads. A good option if you prefer closer hand control or work on small table surfaces.
Extended Stencil Brush Set (For Growing Skills)
Note:Includes classic stencil brushes along with additional brush types for more detailed or experimental work. Suitable once you feel confident with basic stenciling and want to explore more specialized projects.
Versatile Short-Handle Brush Collection
Note: A wider range of brush sizes with short handles, allowing flexibility for both small details and larger stencil areas. A practical choice for varied projects as your practice expands.
Cutting knives:
Starter Precision Craft Knife Set
A practical beginner option with multiple replacement blades, good cutting quality, and an affordable price. Suitable for learning stencil cutting with reliable control.
Multi-Handle Craft Knife Set
A beginner-friendly set that includes several handles and a wider variety of blades. Offers flexibility for different cutting needs while maintaining good quality and value.
Starter Knife Set with Cutting Mat Option
A solid beginner choice with many replacement blades and a comfortable handle. Especially recommended if you do not yet own a cutting mat, making it a practical all-in-one starting solution.
Professional Artist Craft Knife Set
A high-quality option from a trusted art tool brand. Includes multiple handles and a large selection of blades for precise, long-term use — ideal if you want professional-level tools from the start.
Practice Exercise: First Controlled Stencil Print
This exercise is designed to help you physically understand how your fabric stenciling tools behave together.
The goal is not design quality. The goal is control and observation.
What You Need:
- One fabric paint (Textile/Fabric Paint only)
- One stencil brush (flat-topped, firm bristles)
- One simple stencil cut from heavy coated paper or firm cardstock (Choose a simple shape: circle, square, leaf, or geometric form — no details.)
- One light-colored cotton fabric scrap
- A piece of cardboard or any flat, firm surface placed underneath the fabric to prevent paint from bleeding through.
Step-by-Step Practice:
- Place the fabric flat on your working surface. Ensure it is clean and dry.
- Position your stencil securely on the fabric. Hold it steady with your hand.
- Load the stencil brush with a small amount of fabric paint. Remove excess paint by lightly moving and rotating the brush on a clean area of your palette until the paint is evenly distributed in the bristles. The brush should feel lightly loaded, not wet or fully dry.
- Apply paint using a gentle vertical tapping motion. Do not drag the brush. Do not press aggressively.
- Continue until the shape is evenly covered.
- Lift the stencil carefully and place it aside.
- Immediately wash your stencil brush with warm water and mild soap. Fabric paint dries quickly and can harden inside the bristles.
- Allow the print to dry completely.
Observation Guide:
While printing and after drying, observe:
- How the brush feels against the stencil surface
- How much paint is actually needed for full coverage
- Whether paint attempts to spread under the stencil
- The sharpness of the edges
- The flexibility of the painted area once dry
- Whether the fabric stiffens or remains natural
Do not evaluate beauty. Evaluate control.
Optional Documentation (Recommended)
Photograph:
- The stencil before lifting
- The print immediately after lifting
- The dried result
This creates a baseline reference for your future stencil work.
Video Reference: Practice Example
This video shows a simple example of the practice exercise from this lesson. Watch it as a visual reference before completing your own exercise.
Continue Your Learning Path
This lesson introduced the essential tools and materials used in fabric stenciling and how they influence control and results.
In the next lesson, you will begin working with stencil printing through a guided practice, applying what you have learned using simple shapes and controlled paint application.
➡Next Lesson: First Stencil on Fabric