
First Stencil Designing & Cutting
What You Will Understand by the End
- Understand how stencil structures work
How a Stencil Works
Before your first stencil designing for fabric printing, it is important to understand how a stencil actually functions.
A stencil is not simply a drawing that has been cut out. It is a structure made of two essential parts: open space and supporting material.
Positive space: the parts that remain in the stencil material. These areas hold the structure together.
Negative space: the areas that are cut out. Paint passes through these openings and creates the printed image on the fabric.
Understanding this relationship is the first step in creating a functional stencil for fabric printing. If too much material is removed, the stencil loses its structure. If too little is removed, the printed design becomes unclear.
Why Shapes Fall Out
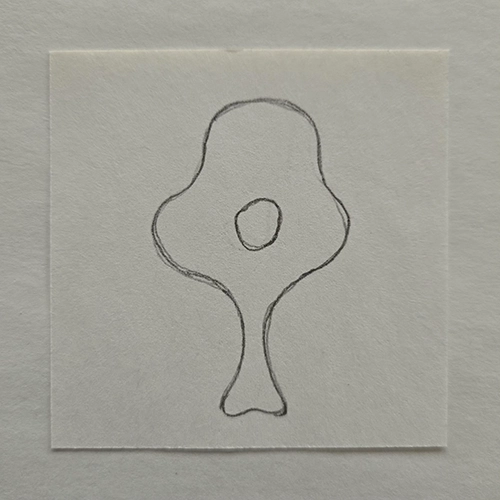
When beginners design their first stencil for fabric printing, they often try to cut shapes exactly as they appear in a drawing.
The problem is that some shapes are completely enclosed. When these areas are cut, the interior pieces detach and fall out of the stencil.
For example, letter D contain internal space. If it is cut without modification, the inner section cannot remain attached to the stencil sheet.
This is why stencil design cannot follow a drawing exactly. The design must be structurally adapted.
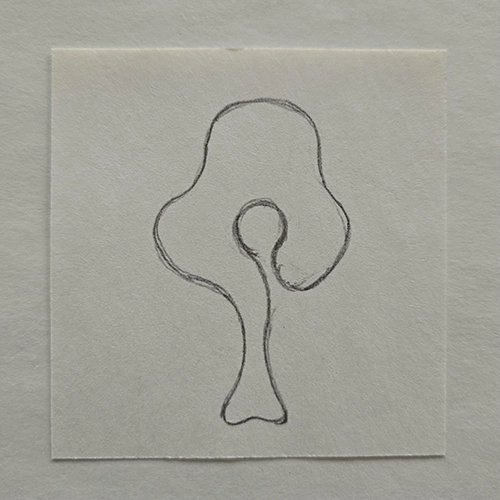
The Role of Bridges
To prevent parts of the design from falling out, stencil designers use bridges.
Bridges are small connections that link isolated areas of the design to the main stencil surface. They keep interior shapes attached while still allowing the stencil to form a clear image when printed.
Good bridges should be:
- Strong enough to hold the structure
- Narrow enough that they do not visually dominate the design
Finding the right balance is part of learning stencil design.
Basic Stencil Thinking
Designing a stencil requires a slightly different way of thinking than drawing. Instead of only focusing on the image itself, you must constantly consider:
- What will be cut away
- What must remain connected
- How the design will behave as a physical object
When you start thinking in terms of structure rather than only image, designing your stencil becomes much easier and more controlled.
Choosing the Right Material for Your First Stencil
When creating your stencil for fabric printing, the material you choose plays an important role. The right material makes the cutting process easier, helps the stencil stay stable, and allows you to focus on understanding the structure of the design.
At this stage, the goal is control and clarity, not durability. For this reason, we begin with simple materials that are easier to cut and handle.
Beginner-Friendly Materials
For your first stencil for fabric printing, the following materials work well:
Paper is easy to cut and widely available. It allows beginners to practice controlling the knife and understanding stencil structure without resistance.
Cardstock is slightly thicker than regular paper, which gives the stencil more stability. It still cuts easily and holds its shape better during testing.
Thin plastic sheets can also work well. They are flexible, slightly more durable than paper, and still manageable for beginners to cut.
Why Mylar Is Not Used Yet
Mylar is a professional stencil material. It is durable, flexible, and resistant to paint and repeated use.
However, mylar is also harder to cut, especially for beginners who are still developing hand control with a precision knife. When students try to learn stencil design and cutting technique at the same time using a resistant material, the process can become frustrating. For this reason, mylar is introduced later in the course.
Material Thickness and Its Effect
The thickness of the material affects two important aspects of stencil work: cutting control and durability.
Thin materials are easier to cut and require less pressure from the knife. This makes them ideal for beginners practicing their first stencil for fabric printing.
Thicker materials are more durable and can be reused many times, but they require better cutting control and sharper tools.
For your first stencil practice, it is better to choose materials that are easy to cut and forgiving, even if they are not meant for long-term use. Once the design and cutting skills become more comfortable, you can move to stronger materials that produce more durable stencils.
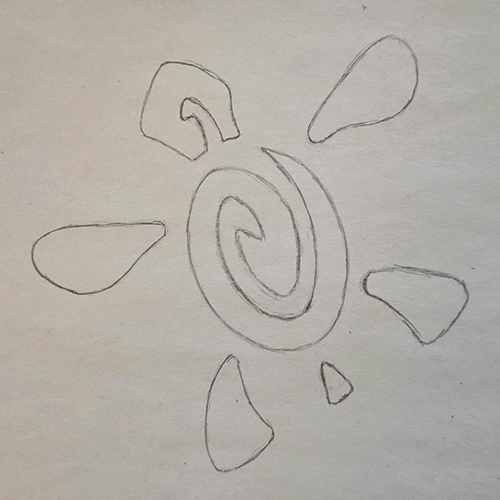
Designing a Stencil-Friendly Image
Designing your stencil for fabric printing requires a slightly different approach than drawing or illustrating. Not every image can work as a stencil without adjustment. Before cutting begins, the design must be simplified and structured so it can function as a stable stencil.
Simplifying the Shapes
A stencil works best with clear and recognizable shapes. Images that contain too many small details can become difficult to cut and may not print cleanly on fabric.
When preparing your first stencil for fabric printing, focus on reducing unnecessary details and keeping the main visual elements. Strong silhouettes and simple forms tend to produce clearer results.
Adding Bridges
As explained earlier, some parts of a design would fall out if they were cut completely. To prevent this, small structural connections called bridges must be added. When designing your first stencil, bridges should be placed wherever an inner shape needs to remain attached to the stencil sheet. These connections keep the structure intact while still allowing the image to appear clearly when printed.
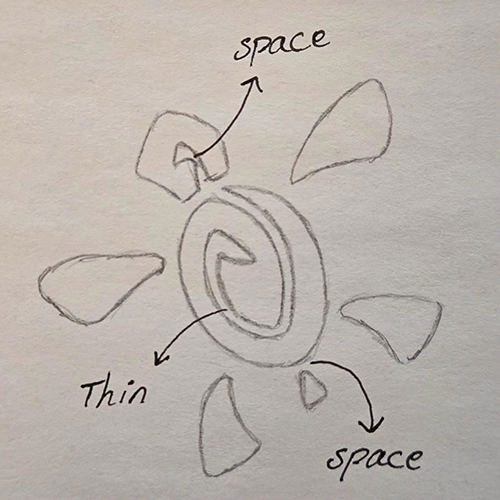
Avoiding Overly Thin Details
Very thin lines or delicate elements are often difficult to cut and may tear during use. They can also allow paint to bleed or spread on fabric. For your first stencil, it is better to keep lines and shapes strong and visible rather than extremely fine. Slightly thicker elements are easier to cut and produce cleaner prints.
Maintaining Spacing Between Elements
If shapes are placed too close together, the remaining stencil material can become fragile. When preparing your stencil for fabric printing, leave enough space between elements so the stencil remains stable and easy to handle. Balanced spacing also improves the clarity of the printed design.
Transferring the Design
There are several simple ways to do this, depending on your tools and drawing confidence.
1. Drawing Directly on the Stencil Material
2. Using Transfer Sheets (Carbon Paper)
3. Using a Light Source (Light Table or Window)

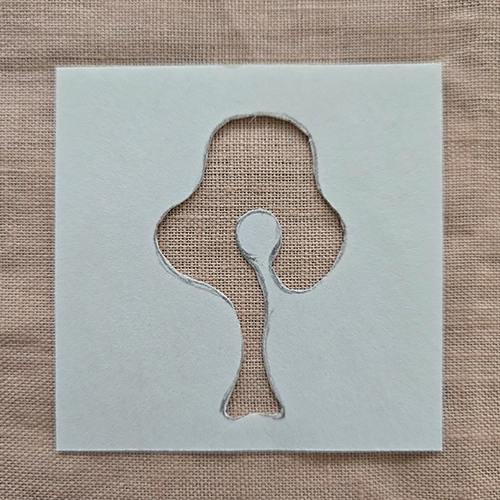
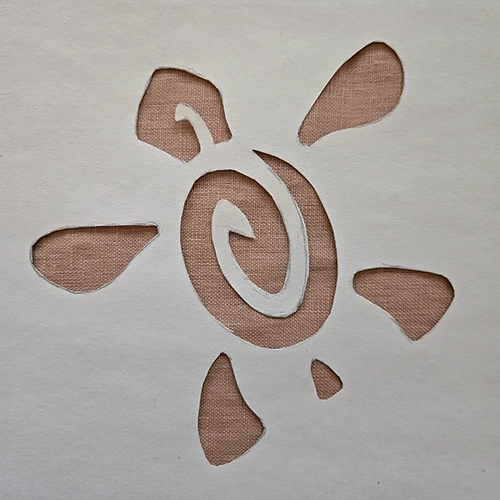
Cutting the Stencil
Clean and precise cutting helps the stencil stay strong and allows the printed design to appear clearly on fabric.
Basic Cutting Tools
To cut your first stencil for fabric printing, you will use the basic tools introduced in Lesson-2. These typically include a precision craft knife and a cutting surface such as a cutting mat. Using the correct tools helps protect your work surface and allows the blade to move smoothly through the material.
Cutting Direction and Control
Good cutting control comes from keeping your hand relaxed and steady while cutting your stencil. You do not need to keep the stencil sheet completely fixed and force your wrist into uncomfortable angles. Instead, try to keep your wrist stable and move your whole hand naturally along the cutting path as much as possible. When the direction becomes difficult, slowly rotate the stencil sheet under your hand so the knife can continue moving in a comfortable direction.
Cutting Sequence
When cutting a stencil, the order of cuts matters. It is best to begin with the interior shapes of the design before cutting the outer areas. Starting with the smaller internal sections keeps the material stable while you work. If the outer shape is cut first, the stencil sheet may move or bend, making the remaining cuts more difficult.
Controlled Cutting Pressure
When cutting your stencil for fabric printing, avoid using excessive pressure on the knife. Pressing too hard can cause the blade to slip or damage the edges of the stencil.
For materials such as paper or thin cardstock, the stencil will often cut with one steady pass. However, for materials such as thicker cardstock or thin plastic sheets, it is better to repeat the same path once more with control rather than forcing the blade through in one heavy cut.

Practice Exercise: Creating Your First Stencil for Fabric Printing
This exercise is designed to help you apply the concepts from the previous chapters and create your first stencil for fabric printing from start to finish.
- Choose a simple but slightly detailed shape so you can practice the key ideas you learned, such as bridges, spacing, and controlled cutting. Good examples include a leaf with visible veins, a small plant branch, or an organic abstract form.
- Start by adapting the shape into a stencil-friendly design. Look at the areas that might fall out and add bridges where necessary. Make sure the shapes are not too thin and that there is enough space between elements.
- Transfer the design onto your stencil material.
- Cut the stencil carefully using the cutting techniques explained in the previous chapter.
- Test your stencil on a piece of scrap fabric.
Output:
- One completed stencil
- One test print on fabric
Optional
You may photograph your stencil and the test print as a record of your first stencil experiment and your progress in learning stencil for fabric printing.
Video Reference: Practice Example
This video shows a simple example of the practice exercise from this lesson. Watch it as a visual reference before completing your own exercise.
Continue Your Learning Path
In this lesson, you explored how stencils work structurally, how to adapt an image into a stencil-friendly design, and how to cut the stencil with control using simple materials.
In the next lesson, you will move from preparation to application. You will learn how to place the stencil on fabric and apply paint in a controlled way to achieve a clean result.
➡ Next Lesson: Fabric Stenciling Fundamentals
There are no reviews yet. Be the first one to write one.